Did you know that with the right steps, mastering 3D modeling in Blender can be easier than you think? For beginners, the sheer range of tools and features in Blender can be overwhelming, often leaving new users wondering where to even begin. But with a straightforward roadmap on how to use Blender 3D modeling, you can bypass the confusion and build a solid foundation quickly. In conclusion, mastering Blender’s interface is the first crucial step towards becoming proficient in 3D modeling. By learning the layout, customizing your workspace, and mastering key navigation and tool shortcuts, you’ll set a strong foundation for your creative journey.
In this guide, we’ll cover the 10 proven steps to help you get comfortable with Blender and start creating your 3D models. For a comprehensive overview of other 3D modeling software, we invite you to explore our detailed blog post.
How to use Blender 3D modeling? 10 Steps
Whether you’re aiming for creative freedom or efficiency, these basics will empower you to dive into 3D modeling with clarity and purpose. By learning how to use Blender 3D modeling, you’ll quickly build a strong foundation that makes your creative process more intuitive and enjoyable.
- Familiarize Yourself with the Layout
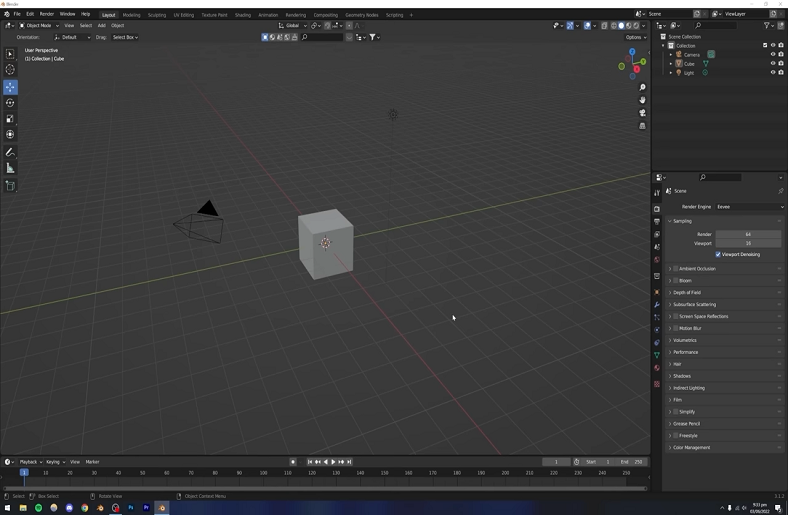
When you first open Blender, take a moment to observe the layout. You’ll find multiple panels such as the 3D Viewport, Outliner, and Properties. Understanding where everything is will allow you to navigate more effectively. - Customize the Workspace
Blender is highly customizable. You can move panels, resize them, and even switch between different workspaces (e.g., Modeling, Sculpting, and Animation). Adjust the workspace to fit your personal preferences for easier navigation. - Learn the Navigation Controls
Blender uses the mouse and keyboard for navigation. Get comfortable using the middle mouse button to rotate the view, the scroll wheel to zoom in and out, and the shift + middle mouse button to pan around your scene. - Understand the Toolbar
The toolbar on the left side of the 3D Viewport houses essential tools for editing and interacting with your models. Familiarize yourself with the tools like Move, Rotate, and Scale, which are essential for 3D modeling. - Explore the Outliner Panel
The Outliner on the top-right panel shows all the objects in your scene. It’s an important tool for managing your objects, collections, and layers, making it easier to select and organize your work. - Use the Properties Panel
The Properties Panel is where you adjust settings for objects, materials, modifiers, and more. It’s vital for customizing your scene and fine-tuning details such as textures, lighting, and camera settings. - Get Comfortable with the Timeline
The Timeline at the bottom allows you to view and manipulate your animation keyframes. Even if you’re not animating right now, it’s important to know how to navigate it for future work. - Learn the Shortcut Keys
Blender’s keyboard shortcuts can significantly improve your efficiency. For example, pressingGmoves objectsRrotates them, andSscales them. Memorize basic shortcuts to save time. - Set Up Your Preferences
Blender allows you to adjust its preferences to match your workflow. Go toEdit > Preferencestweak settings like input devices, themes, and more, to make your experience more comfortable. - Save Your Workspace Layout
Once you’ve customized your layout and feel comfortable, save it! This way, you can return to a familiar setup each time you open Blender, helping you stay focused on your work rather than adjusting the interface.
By mastering these foundational steps, you’ll be able to confidently navigate Blender and streamline your 3D modeling process, setting you up for more advanced techniques down the road.
Basic Instructions Detail
Navigating any new software can feel overwhelming, especially one as feature-rich as Blender. For beginners, a clear understanding of Blender’s setup and layout is essential to jumpstart a smoother, more productive learning experience. In this section, we’ll focus on the foundational steps that will allow you to confidently navigate Blender’s interface, setting you up for more advanced techniques to come.
Studies on learning new tools show that an intuitive understanding of interface layouts can improve user efficiency by up to 30% over time, and Blender’s customizability and feature set are no exception.
1. Downloading and Installing Blender
According to Blender’s statistics, over 14 million people have downloaded Blender since it became open-source, reflecting its popularity and accessibility. Installation is straightforward, but understanding system requirements is crucial for an optimal experience.
- Actionable Tips:
- Visit blender.org for the latest stable release and follow the step-by-step installation process for your operating system (Windows, macOS, or Linux).
- System Requirements: Blender recommends at least 4GB of RAM (8GB or more for large projects) and a dedicated graphics card for a smoother experience. Investing in a higher-performing machine can prevent lags and crashes, especially with larger models.
- Update Regularly: Bookmark the download page and check back periodically, as Blender releases updates every 2-3 months, packed with new features and performance improvements.
2. Navigating Blender’s Interface Like a Pro
Blender’s interface is unlike other design software, but learning its layout will speed up your workflow significantly. Research shows that familiarizing yourself with software interfaces early on leads to faster task completion, making it an essential step for efficient modeling.
- Main Interface Sections:
- Viewport: The Viewport is your primary modeling space and will be where you spend most of your time.
- Outliner: The Outliner lists all objects in your project, helping you manage and organize complex scenes easily.
- Properties Panel: Here, you’ll find controls for object properties, materials, and render settings.
- Supporting Evidence: Seasoned Blender users attest to the importance of understanding the layout, as it reduces the time spent on searching for functions and lets you focus more on the creative process.
Actionable Tips:
- Spend 5-10 minutes moving through each panel to understand its purpose and familiarize yourself with what each one offers.
- Customize Your Layout: Resize panels by dragging their borders or open multiple Viewports to enhance your perspective, especially for complex projects.
Think about your last design project. Was it easy to find every tool you needed? Learning Blender’s layout will make your next project smoother from the start.
3. Mastering Basic Controls for a Smooth Workflow
Understanding the basics of Blender’s controls is essential for new users, and proficiency here will lead to more accurate modeling. By mastering basic actions like moving, rotating, and scaling objects, beginners gain confidence and control over their projects.
- Selecting Objects: Learn how to right-click to select objects, which differs from traditional left-click selection in other software.
- Basic Transformations:
- Move (Translate): Use G to grab and move objects.
- Rotate: Use R to rotate, giving you control over how each object interacts in the space.
- Scale: Use S to adjust size, allowing for realistic proportions.
- Supporting Evidence: Many professional 3D artists recommend consistent practice with basic controls, as it’s key to developing a precise, efficient workflow.
Actionable Tips:
- Try adding simple shapes like cubes or spheres to your Viewport and use the G, R, and S keys to practice moving, rotating, and scaling each one.
- Experiment with axis-specific transformations (e.g., G + X to move along the X-axis) to understand how to position objects precisely.
Ready to see your models come to life? These basic controls may seem simple, but they’re the foundation for intricate designs and complex models.
By mastering Blender’s setup and interface, you’re creating a solid base from which to explore more advanced modeling tools. Understanding these essential basic controls to Blender’s customizable layout saves time, enhances precision, and lays the groundwork for more creative 3D projects. In the next section, we’ll take these foundational skills further as we dive into Blender’s core modeling tools and techniques. Get ready to start building!
Conclusion
In conclusion, mastering Blender’s interface is the first crucial step towards becoming proficient in 3D modeling. By learning how to use Blender 3D modeling, familiarizing yourself with the layout, customizing your workspace, and mastering key navigation and tool shortcuts, you’ll set a strong foundation for your creative journey. As you continue to explore and experiment, the more intuitive and efficient Blender will become. With these basic steps under your belt, you’re now ready to dive deeper into the world of 3D modeling and unlock the full potential of this powerful software. Happy modeling!


